Canva is a flexible online graphic design tool that enables users to quickly create designs that are visually attractive and appear professional. Canva offers the tools and resources you need to realize your creative ideas, whether you’re an individual, a small company owner, or a member of a large organization.
To blur an entire picture in Canva, click on the “Edit Image” button. Then, select the “Blur” effect and click the “Auto” button to apply a blur effect to the entire image. You can further adjust the blur intensity as per your preference. On the other hand, if you wish to blur only a specific portion of your picture, you can manually draw the blur effect using the “Blur” and “Restore” buttons.
Don’t worry if you have questions regarding the Canvas blurring tool. We’ll walk you through everything and make sure you understand everything. So let’s get started.
- Why Use Canva to Blur Pictures or Faces?
- How to Blur a Full Picture in Canva with the Blur Tool
- How to Blur Part of a Picture in Canva with Manual Blur Tool
- 1. Select the picture you want to blur
- 2. Click on the “Edit Image” button
- 3. Locate the “Blur” Option in the Editing Menu
- 4. Click on the “Blur” button within the “Blur” options
- 5. Adjust the intensity, spread, and size of your brush for your blur
- 6. Blur your picture as needed
- 7. Restore your picture if needed
- How to Blur Part of a Picture in Canva with the Auto Focus Tool
- Conclusion:
- Frequently Asked Questions:
Why Use Canva to Blur Pictures or Faces?
Canva Blur offers several advantages, making it a preferred choice.
- Ease of use: Canva’s user-friendly interface makes it accessible to users of all skill levels. Whether you’re a beginner or an experienced designer, you can navigate the platform effortlessly and achieve professional-looking results.
- Comprehensive design capabilities: Canva is not just a tool for blurring images; it’s a full-fledged graphic design platform. This means you can access various design features, templates, and customization options beyond blurring.
- Customization options: Canva allows you to fine-tune the blurring effect according to your preferences. You can adjust the intensity of the blur, choose from different blur effects, and experiment with various options to achieve the desired outcome.
- Canvas crop tool for precise blurring: The canvas crop tool comes in handy if you only want to blur specific faces or areas within an image. The blurring process can be done quickly and effectively, ensuring that the privacy or anonymity you seek will be maintained.
- Versatile application: While this article focuses on blurring pictures or faces, Canva offers various design capabilities.
No matter how experienced or inexperienced you are as a designer, Canva makes it straightforward and easy to create blurring effects.
How to Blur a Full Picture in Canva with the Blur Tool
To blur a complete picture in Canva with the blur tool, click on the “Edit Image” button. Choose the “Blur” effect and click the “Auto” button. Use the intensity slider to increase or decrease the blur covering your picture.
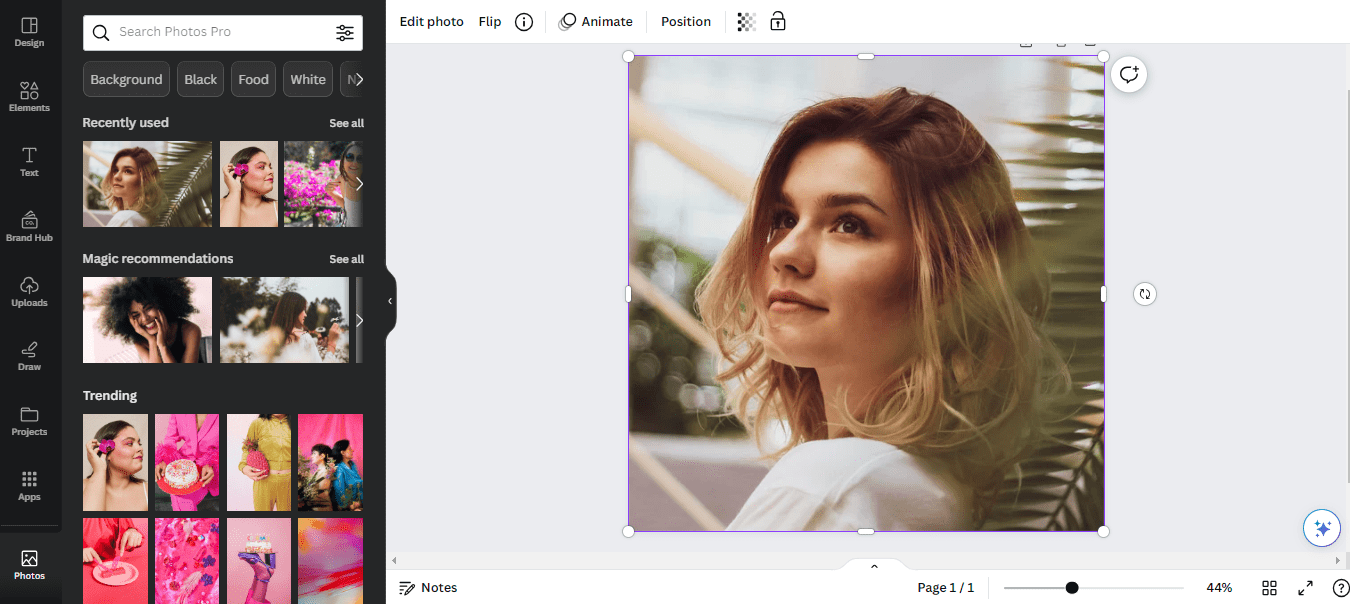
1. Choose the image you want to blur
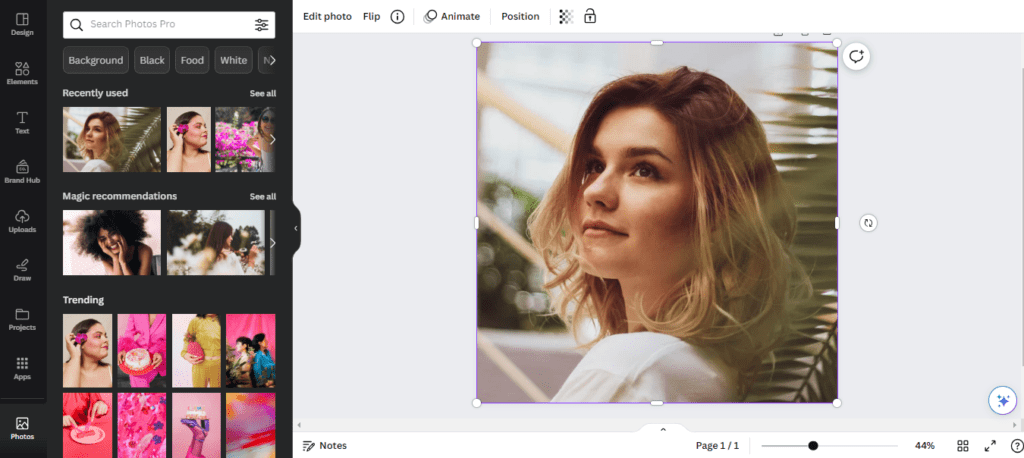
It’s simple to use the Canvas blur effect! Begin by picking the image to be blurred. Remember that the blur effect will only be applied to the selected image, even if you have numerous photos in your design.
Click on a photo to pick it up. An outline emerges around the selected image, showing its selection.
You can now alter the image once you’ve set the photo(s) and completed the Canva upload process.
2. Click on the “Edit Image” option
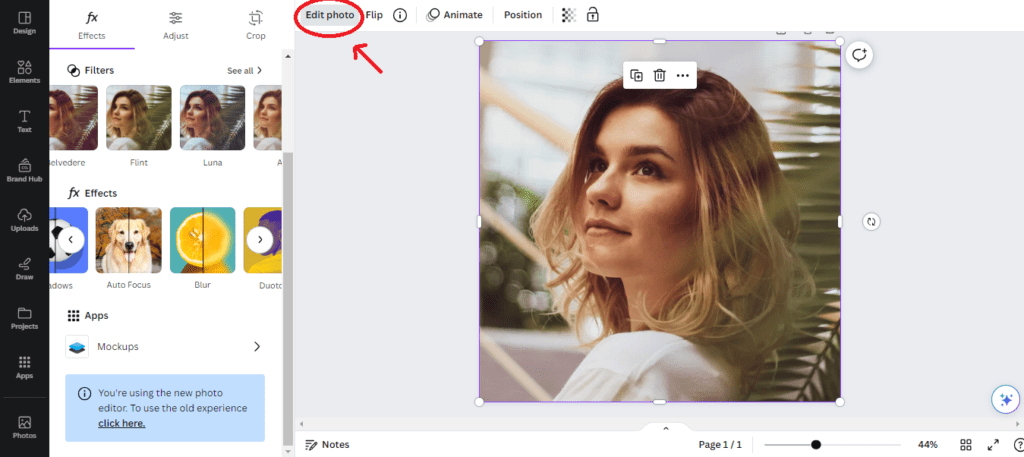
The ‘Edit Image’ button on Canvas is quick and simple. Look in the top toolbar for it. After you’ve confirmed that you’ve chosen the correct image, click the ‘Edit Image’ button.
This button is clearly accessible, allowing you to access Canva image editing features. By clicking on the image, you’ll gain access to a variety of powerful tools for enhancing and modifying it.
3. Locate the “Blur” button in the “Tools” menu
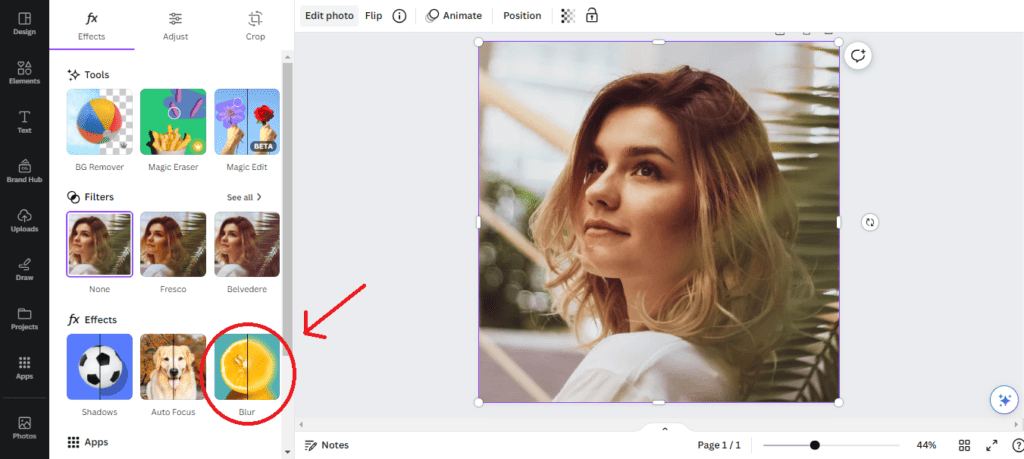
Finding the “Blur” button in the image editing menu is simple. To find it, you can either type “blur” into the search field or scroll through the various alternatives until you find it. The “Blur” button is located in the extensive “Tools” list.
Typing “blur” in the search bar will reduce the options and emphasize the “Blur” feature if you want a quick and targeted search. You can speed up the procedure by going straight to the desired feature.
4. Click on the “Auto” button in the “Blur” options
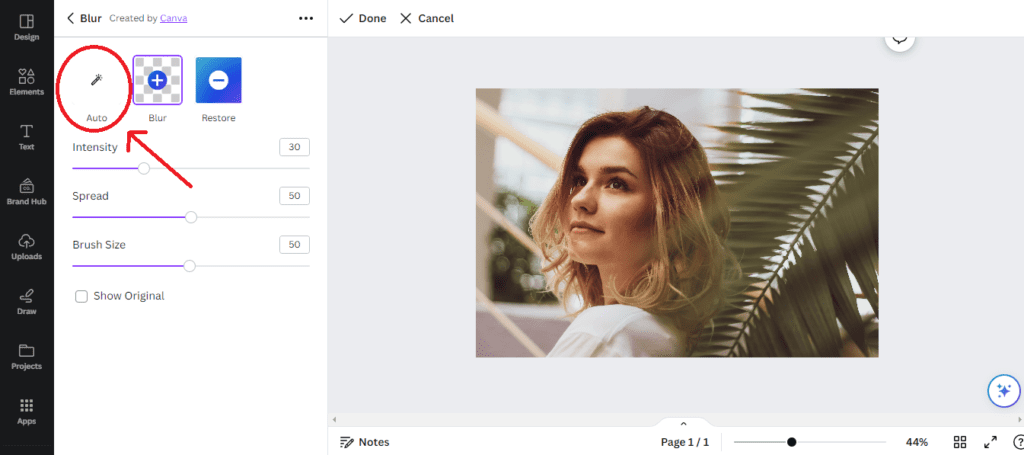
The “Auto” button under the “Blur” options is your best bet if you want to apply a thorough blur effect to the entire image. This button starts the automatic blurring technique that Canva uses to blur your image.
By using the “Auto” button, you give Canva the details of the blurring process, ensuring a smooth and polished outcome. You can save time and effort by using this useful tool to streamline the job and provide the appropriate visual result.
5. Adjust the intensity of your blur
After Canva has applied the blur effect to your image, you may adjust the intensity to your Choice.
The “Intensity” slider can be changed to alter the blur level. With this effective tool, you can smoothly modify the blur effect to get the desired result.
To suit your creative vision, you may easily strengthen or soften the blur effect by moving the slider. You gain the ability to strike a balance between a light, delicate touch, and a bolder, more dramatic blur.
6. Repeat as Needed
Repeat the technique for any additional photos in your design that also need to be blurred once you’ve successfully applied the desired blur effect to one image. To get consistent and eye-catching outcomes, adhere to the previously described stages.
Now that we have covered blurring a full image, let’s look at how to use the Canvas design editor to cloud-specific sections inside an image.
There are two separate ways to execute this artistic style, each with a different approach and scope for creativity. Check out more intriguing articles from Adventures with Art for additional information and ideas on various artistic projects!
How to Blur Part of a Picture in Canva with Manual Blur Tool
In this section, we’ll go over two techniques for blurring a particular region of your photo. The more expedient but less exact method of accomplishing this effect will be discussed in the section that follows.
Here, we’ll concentrate on an approach that uses the blur tool, however, it might take longer. The benefit of this method, however, is that it enables total customization, ensuring that the blur is precisely placed where required.
To get this result, adhere to the following detailed instructions:
1. Select the picture you want to blur
Select the image to which you want to apply the blur effect. Keep in mind that the blur will only be applied to the current image. If your design has many images, activate or highlight the one on which you wish to use the blur effect. If you have several photographs that need to be blurred, repeat these procedures for each one.
2. Click on the “Edit Image” button
Once you’ve confirmed that you’ve chosen the correct image for modification, click the “Edit Image” button to begin the editing process. This button is located at the top of your screen and provides quick access to image editing options.
3. Locate the “Blur” Option in the Editing Menu
The next step is to locate the “Blur” button in Canva’s image editing menu. To access the “Blur” option quickly, type “blur” into the editing menu’s search field. Canva will present you with the necessary alternatives, and you can move on to the next step.
Alternatively, navigate the editing menu options until you come across the “Blur” button. It should be found in the “Tools” menu, which provides a variety of image-altering tools.
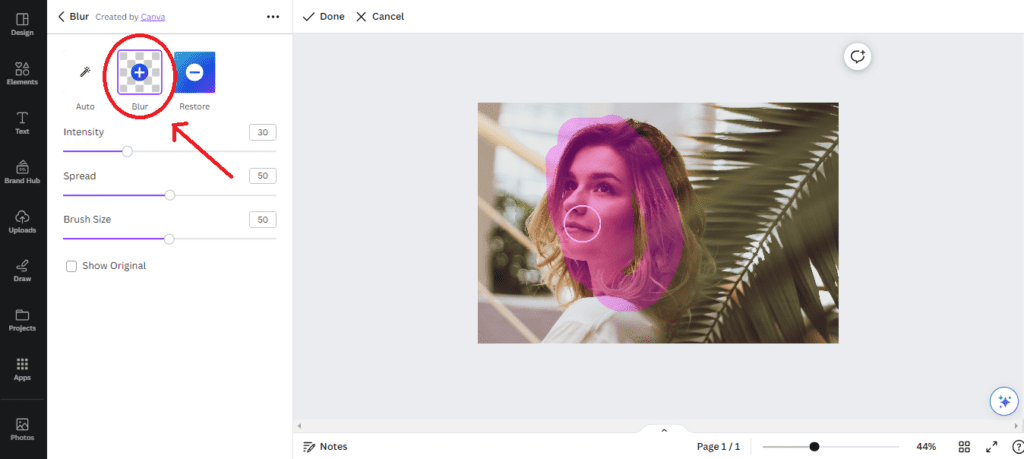
4. Click on the “Blur” button within the “Blur” options
Find the “Blur” button among the available options once you’re in the image editing menu. The button to create a blur effect can be recognized by a plus sign on a transparent background. To add the blur effect to your photograph, click on it after that. By doing this, you can make the image’s chosen portions blurry.
5. Adjust the intensity, spread, and size of your brush for your blur
By using this method, you’ll have access to a potent blur brush that lets you selectively blur portions of your image. The initial step in the process is to adjust your blur brush to your choice.
Start by choosing the best parameters for your blur brush, taking size, spread, and intensity into account. How the blur effect is applied to your photograph will be determined by these parameters. By customizing the brush to meet your unique needs, you can get the required blur level at the targeted locations.
6. Blur your picture as needed
It’s now time to blur your image with your blur brush! Begin by clicking on your image and dragging the blur brush tool over the regions you want to blur. You’ll see that anything you’ve marked will turn pink as you draw. When you let go of the mouse button, the pink-marked areas will become blurred.
Remember that this technique may necessitate some trial and error to reach the desired outcomes. Don’t be afraid to experiment with alternative approaches and to use the Canvas undo button as required.
Also, don’t worry if you make a mistake; deleting areas of the blur is simple, as we’ll see momentarily.
In addition, you can use the “Show Original” button below the brush sliders. If, at any point, you need to view the original appearance of the image, click that button.
7. Restore your picture if needed
While adding the blur effect to your image, you may realize you’ve gone too far and are unable to undo your actions. For example, you may have accidentally blurred your darling puppy in the process.
In such instances, the “Restore” button comes to the rescue! The minus symbol represents this button, which eliminates the blur effect from your image.
You can change the intensity and spread of the repair brush inside the restore option. Draw over the sections of your image where you wish to eliminate the blur once you’ve tweaked these sliders to your taste.
The highlighted regions will turn pink as you sketch. When you release the mouse button, the pink-marked regions in your image will be returned to their original state.
How to Blur Part of a Picture in Canva with the Auto Focus Tool
In photo editing, certain parts are blurred to improve the aesthetic appeal and highlight the main topic. An easy-to-use Auto Focus function is provided by Canva to streamline the procedure. Using the Canvas Auto Focus tool, this procedure successfully blurs a portion of a photograph. Let’s investigate the procedure and produce spectacular images!
1. Assess Your Image:
Start by closely inspecting your photograph to see if the blurring technique you’ve chosen is appropriate. This method functions best when the focus point of your image is a distinct object. Images that don’t require significant changes make excellent candidates for this method.
2. Select the Image and Open the Auto Focus Tool
To choose the image you just uploaded, click it. Then, look for the “Effects” tab in the toolbar. The Auto Focus tool may be found in the Effects menu. For the options to appear, click on it.
3. Identify the Area to Blur
Analyze your photograph carefully and decide which areas you want to blur. It could be a background, a person’s face, or any other aspect that you want to draw attention to. This option instructs the Auto Focus tool on how to apply the blurring effect exactly.
4. Adjust the Intensity of the Blur
Using the sliders offered by the Auto Focus tool, change the blur’s strength to get the desired result. You may adjust the blur’s size and feathering in Canva. Slide the sliders around until you get the ideal harmony that improves your image without being too dominant.
5. Fine-tune and preview:
After you’ve expanded the blur, go over the results carefully and make any required adjustments. Consider the overall composition, the sharpness of the focal region, and the smoothness of the transition. Use the preview settings to check the output before saving your altered image.
6. Experiment and Undo as Needed:
Feel free to play around with various blur expansion and intensity settings to achieve the right balance for your image. Use the undo button to go back to a prior editing step if you’re not happy with a certain alteration. You can adjust your blurring approach using this flexibility until you get the appropriate visual impression.
Conclusion:
In conclusion, Canva offers a simple and effective solution for blurring pictures or faces in photos. With its user-friendly interface and powerful editing tools, even those without extensive technical knowledge can quickly achieve professional-looking results. Whether you want to protect the privacy of individuals in a photo or add a creative touch to your images, the Canva face blur feature has you covered.
Following the step-by-step guide outlined in this article, you can quickly learn how to use Canva to blur pictures or faces. Consider the legal and ethical aspects of face blurring and use it responsibly. Experiment with different techniques and settings to achieve the desired level of blur while maintaining the overall quality of the image.
Now that you know how to blur pictures or faces easily using Canva, you can confidently edit your photos and ensure the anonymity or artistic effect you desire. So why wait? Give it a try and start blurring your pictures with Canva today!
Frequently Asked Questions:
Can I use the Canvas face blur tool on mobile devices?
Yes, Canva offers a mobile app that allows you to access and use the face blur tool on your smartphone or tablet. Simply download the Canva app from your device’s app store, sign in to your Canva account, and you’ll have the option to blur faces in your photos on the go.
Is face blurring reversible in Canva?
Yes, Canva face blur tool is non-destructive, which means you can easily remove or adjust the blur effect anytime. If you change your mind or want to modify the blur level, access the photo in Canva, locate the face blur tool, and make the necessary changes.
Will the blurred faces remain hidden if I share the photo on social media?
The blur effect remains intact when you download the edited photo from Canva. Your blurred faces will stay hidden whether you share the photo on social media platforms or other online channels. However, it’s always a good idea to double-check the privacy settings on your venue to ensure the image is shared with the desired level of privacy.
Are there any limitations to the number of faces I can blur in a single photo?
No, Canva does not limit the number of faces you can blur in a single photo. Whether it’s one or multiple fronts, you can apply the blur effect to protect the identities of individuals featured in the image.
Can Canva automatically detect and blur faces in a photo?
Currently, Canva’s face blur tool does not have an automatic face detection feature. You must manually select and apply the blur effect to individual faces in your photos. However, Canva’s user-friendly interface and intuitive controls make it easy to accomplish this task effectively.